Using G8 in Your Host
Special Note:
If you plan on using the Sidechain Inputs and Reject Outputs, we recommend using the VST version of G8 whenever possible.
Ableton Live
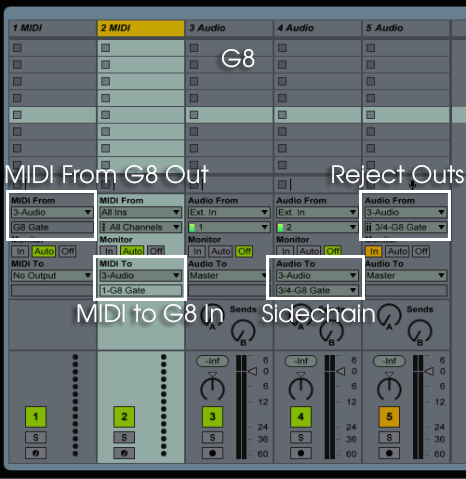
MIDI In to G8:
- Add an instance of G8 to an audio track that you want to apply gating to.
- Create a MIDI track. Optionally, create a clip with the pattern that you want to use for gating.
- Click the “IO” symbol on the right side of the Ableton window to show the input/output section for each track.
- Go to the created MIDI track, and select the “MIDI To” dropdown, selecting your audio track that G8 is using.
- The subcategory dropdown menu right below this should now activate allowing you to select “1 G8 Gate.” Selecting G8 will route the MIDI track into G8 so that you can use it to control the gate’s envelope. Make sure to set G8’s MIDI input note is set to whatever note is being used in your pattern.
MIDI Out from G8:
- Add an instance of G8 to an audio track.
- Create a MIDI track.
- Click the “IO” symbol on the right side of the Ableton window to show the input/output section for each track.
- Go to the created MIDI track, and click the first “MIDI From” dropdown, selecting your audio track that G8 is using.
- The subcategory dropdown menu right below this should now activate allowing you to select “1 G8 Gate.” Selecting G8 will route the MIDI from G8 into this track.
- Set “Monitor” to “In”. This will enable MIDI to reach this track, even when it’s not set to record.
Sidechain Ins:
- Add an instance of G8 to an audio track that you want to apply gating to.
- Create a second audio track with the clip you want to use as a sidechain.
- Click the “IO” symbol on the right side of the window to show the input/output section.
- Go to the sidechain track, and select the “Audio To” dropdown, changing “Master” to your main audio track.
- The subcategory dropdown menu right below this should now activate allowing you to select “3/4 G8 Gate.” Activating this setting will route the sidechain track into the third and fourth inputs on G8 so that you can use it to control the gate’s envelope.
- If you would still like to hear the audio going to G8’s sidechain input, create another audio track.
- Set the new audio track’s input to the track that you are sending to G8.
- Set “Monitor” to “In”. Now you will simultaneously hear G8 Gate and its sidechain input.
Reject Outs:
- Add an instance of G8 to an audio track that you want to apply gating to.
- Create a second audio track for receiving audio from G8’s Reject Outs.
- Click the “IO” symbol on the right side of the window to show the input/output section.
- Go to the track that is receiving audio from the Reject Outs, and click the first dropdown box under “Audio From”. From here, select the track that G8 is on.
- The second dropdown box will now allow you to select “G8 Gate 3/4”.
- Set “Monitor” to “In”. This will allow you to always hear the audio coming from G8’s Reject Outs.
Bitwig Studio
MIDI In
- Create an instrument track.
- Add an instance of G8 to this instrument track. There should not be anything before G8 on this track.
- Create a MIDI clip. The MIDI from this clip will go to G8’s MIDI input.
To route audio into G8 with this setup:
- Create an audio or instrument track that you want to be gated.
- Set the output of that track to be the instrument track that G8 is currently on.
MIDI Out
-Place an instance of the instrument you want to send MIDI to after G8 Gate.
Sidechain Ins and Reject Outs:
Unfortunately, Bitwig does not support routing to or from multi-channel plug-ins at this time. When Bitwig is updated, we will update this manual to provide instructions on how to use it.
Cubase
Digital Performer
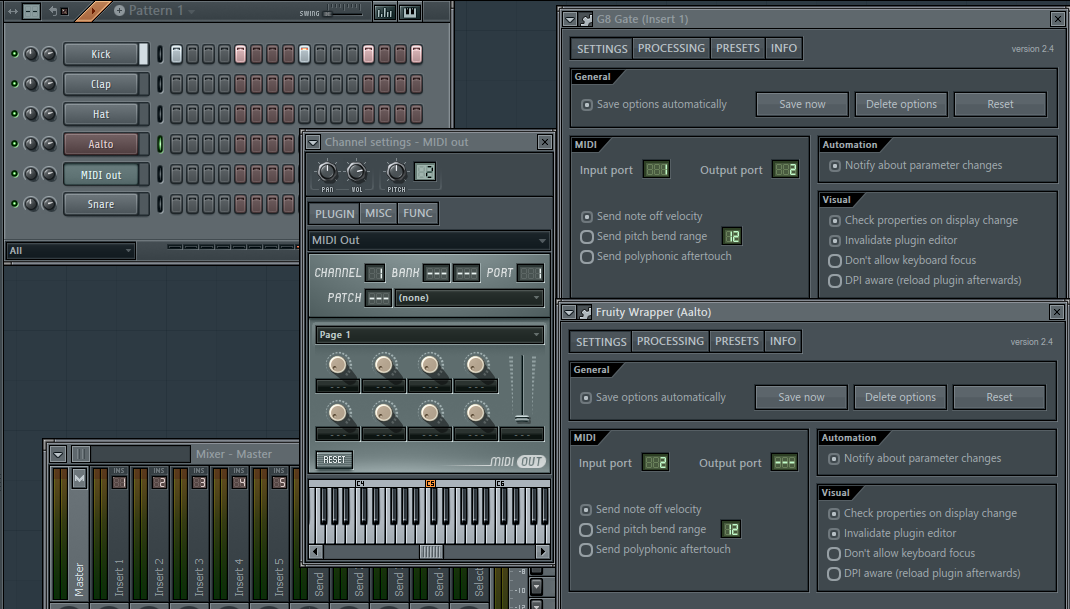
FL Studio
Please note that G8 Gate will not produce a gating effect in FL Studio until the Reject Outputs are manually set to a different channel. This is due to the fact that FL Studio groups a plugin’s aux ins and aux outs together. Keep this in mind when using Expert Mode, as well, as a standard input will be sent to inputs 1, 2, 3, and 4 until the sidechain input is manually setup.
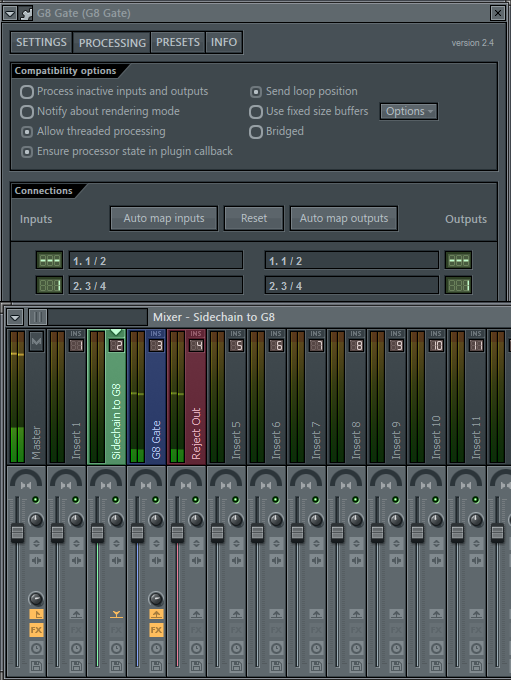
Sidechain Ins
- Create an instance of G8.
- Select a mixer track to route to G8’s sidechain input.
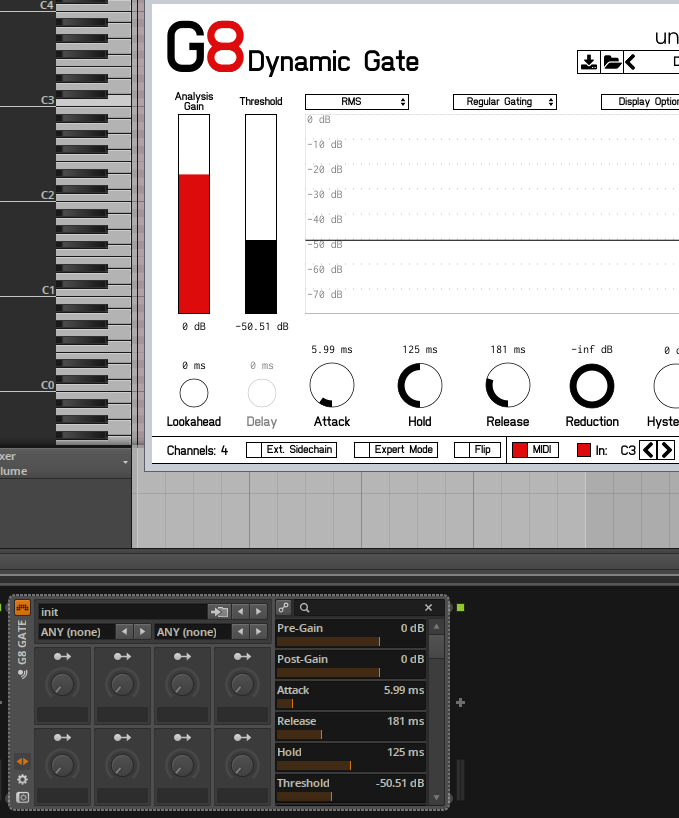
- With the sidechain track focused, click on the “Send to” button on G8’s track (see above photo).
- Open up G8’s editor and select the settings page.
- Change input 3/4’s routing to “1”. This will route the sidechain mixer track into G8.
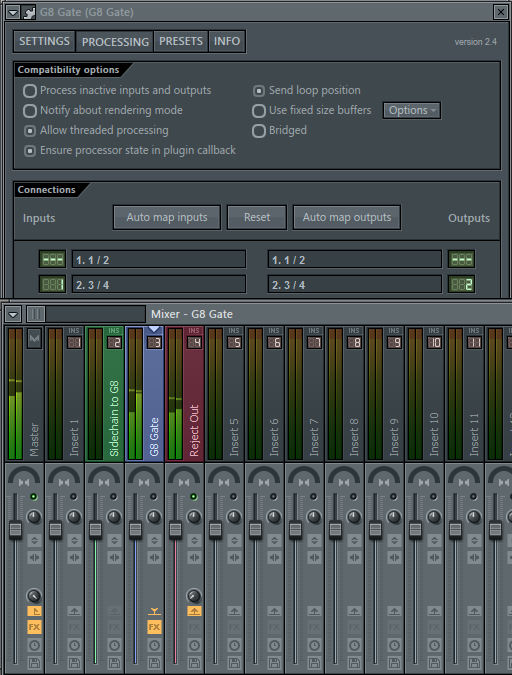
Reject Outs
- Create an instance of G8.
- Select a mixer track to route G8’s Reject Output to.
- With the G8 mixer track focused, click on the “Send to” button on the Reject mixer track (see above photo).
- Turn the Gain on the send completely off. Otherwise, you will hear all of G8’s track AND the Reject.
- Open up G8’s editor and select the settings page.
- Change output 3/4’s routing to “2” (“1” is the Master Out). This will route G8’s reject outputs to that track.
- Please note that if the Reject Out and the Main Out are both audible, G8 will not have an effect on the audio. If you want traditional gating behavior, mute the Reject Output mixer track.
MIDI In
- Create a MIDI Out Device and an instance of G8.
- Select a port to send MIDI on.
- Open up G8’s settings menu.
- Select the same port to receive MIDI on.
MIDI Out
- Create an instance of G8.
- Open up G8’s settings menu.
- Select a MIDI Out port.
- Open up an instrument that you would like to send MIDI to.
- Open this instrument’s settings menu.
- Set the instrument’s MIDI In port to be the same as G8’s MIDI Out port. In the image above, we are triggering Madrona Labs’ Aalto, one of our favorite softsynths.
Logic Pro X
Unfortunately, Logic does not support Sidechain Ins, Reject Outs, or MIDI Out at this time. We are waiting for aux port support from the JUCE plug-in library that we are using. Additionally, MIDI Out from AU is not supported in most AU hosts. When we add in aux port support for Logic, we will release a free update for G8.
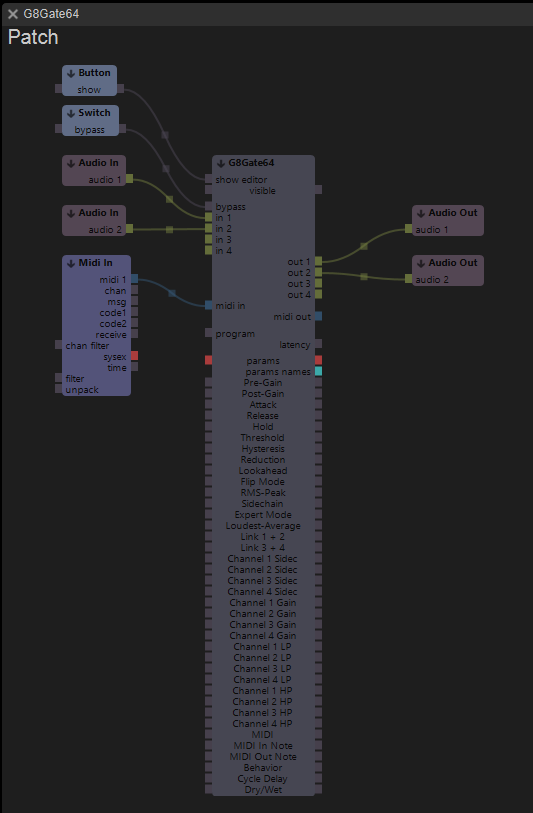
Max/MSP
Sidechain Ins and Reject Outs:
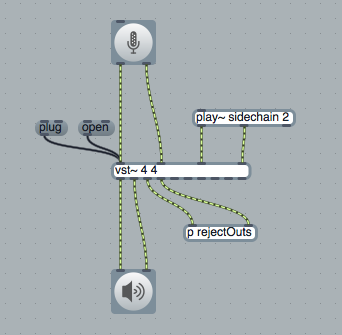
Due to the modular, visual nature of Max/MSP, it is extremely easy getting setup with G8’s routing.
- Create a “vst~ 4 4” object. The “4 4” argument means that the plug-in will have four inputs and four outputs.
- Create a message object (hit ‘m’ to create one quickly). Write “plug” (no quotes) in this message box. Connect it to the first input of the vst~ object.
- Click the “plug” message. It will bring up a window to load a plug-in on your hard drive. On OS X, this will be under /Library/Audio/Plug-ins/VST/Unfiltered Audio/. We recommend using the VST version in Max/MSP.
- Create a message object, this time called “open”. This message object will allow you to see your interface.
- The first two inputs of the vst~ object are the main ins, while the second two are the sidechain ins.
- The first two outputs of the vst~ object are the main outs, while the second two are the reject outputs.
MIDI
Using MIDI in Max/MSP is outside the scope of this manual. The above instructions will help you to get G8 loaded and running. For an interactive guide to using automation with the vst~ object, hold “alt” and click the vst~ object while the Max patching window is unlocked.
Numerology

MIDI in to G8
After G8 is loaded into a rack, hit your “Tab” key to switch to cabling mode. Here, you can easily connect other modules to G8’s MIDI input.
REAPER
Initial Setup for Sidechain Ins and Reject Outs
- You will need to make G8 aware of four input and output channels.
- First, add G8 to a track and bring up the editor window.

- Click the REAPER button “2/4 In 2/4 Out” to bring up the routing matrix.
- Click the small “+” button on the routing matrix to add 2 channels of input and output.
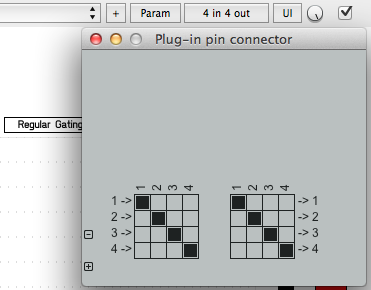
- The button should now say “4 In 4 Out”. The bottom left corner of G8 should say “Channels: 4”.
- Now, bring up the track’s routing panel by clicking the “IO” button on the G8 track. If you are using a different REAPER skin, this button might not say “IO”.
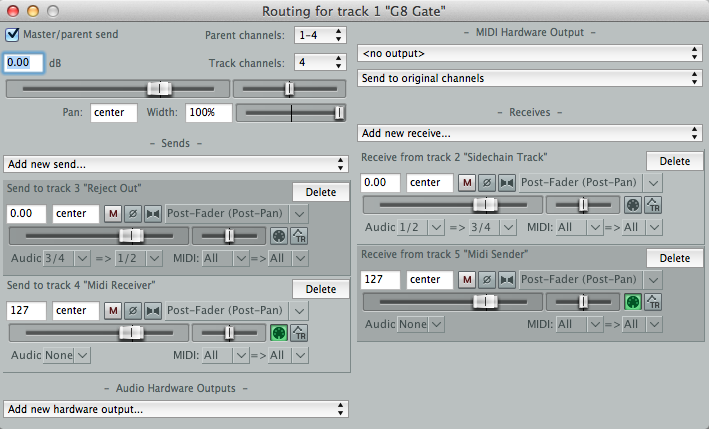
Sidechain Inputs
- From the track’s routing panel, create a new “Receive” from the track you want to use as the sidechain.
- Select “Audio: 1/2 => Audio: 3/4”. This means that the main output of the sidechain track (channels 1 and 2) are being routed to the sidechain inputs (channels 3 and 4) of G8.
Reject Outputs
- From the track’s routing panel, create a new “Send” to the track you want to use for Reject Outputs.
- Select “Audio: 3/4 => Audio: 1/2”. This means that the Reject Outputs (channels 3 and 4) of G8 are being routed to the other track’s main inputs (channels 1 and 2).
MIDI Input
- From the track’s routing panel, create a new “Receive” from the track you want to receive MIDI from.
- Select “Audio: None”. This will automatically turn on MIDI receive for the track. If you would like to receive audio and MIDI simultaneously, click the MIDI button (with the MIDI cable icon) to turn on MIDI receive.
MIDI Output
- From the track’s routing panel, create a new “Send” to the track you want to send G8’s MIDI output to.
- Select “Audio: None”. This will automatically turn on MIDI send for the track. If you would like to send audio and MIDI simultaneously, click the MIDI button (with the MIDI cable icon) to turn on MIDI send.
Renoise
Renoise, unfortunately, does not support routing of multi-channel plug-ins or plug-in MIDI routing. If these features are added to Renoise in the future, we will update this manual with instructions on how to use them.
Sonar
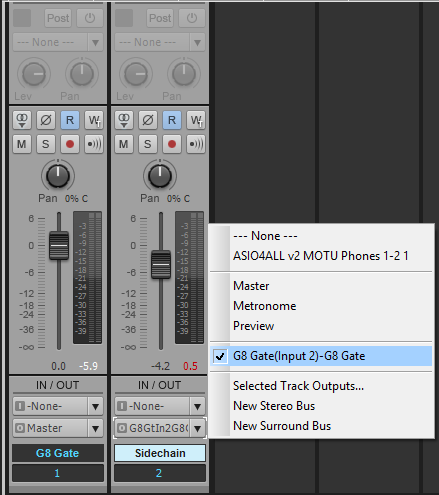
Sidechain Ins
- Add G8 to an audio track.
- Select another audio track that you want to route to G8’s sidechain.
- Select either the Send Out or the Main Out section of that track. With Send, you will still hear the track that you are using for sidechaining.
- Select the output dropdown under your chosen section and select G8 Gate Input 2.
Studio One
Sidechain Ins and Reject Outs:
Unfortunately, Studio One does not support audio routing to or from multi-channel VST2 plug-ins. We plan on releasing a VST3 version of G8 in the future. This will be a free update to all users.
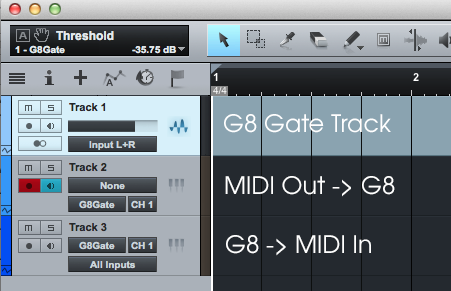
MIDI:
Routing MIDI to and from G8 is extremely easy in Studio One.
- Add G8 Gate to an audio track.
- Create an instrument track.
- For receiving MIDI from G8, click the MIDI input selector (the top one) and select G8 Gate channel 1.
- For sending MIDI to G8, click the MIDI output selector (the bottom one) and select G8 Gate channel 1.
Usine Hollyhock
Sidechain Ins, Reject Outs and MIDI
Setting up G8 is extremely easy in Hollyhock. Simply drop G8 onto a rack, and double-click it to bring up the modular patching view. Sidechain Inputs are inputs 3 and 4, while the Reject Outputs are outputs 3 and 4.